Affiliate Disclosure: This post contains affiliate links. If you purchase or sign up through one of these links, we may earn a commission at no extra cost to you. Our recommendations are based on publicly available information, official documentation, and the factors discussed in this article. Affiliate relationships do not determine our editorial conclusions.
How We Researched This Guide: This guide is based on Kinsta’s publicly available migration documentation, MyKinsta product pages, and support articles, reviewed and updated as of August 2026. Where pricing, timelines, or feature availability are mentioned, they reflect what Kinsta currently publishes on its own site. We link directly to the source documentation throughout so you can verify each detail yourself.
Table of Contents
- Quick Answer
- Introduction
- Before You Migrate Your WordPress Site
- Does Kinsta Offer Free WordPress Migrations?
- What You Need Before Starting
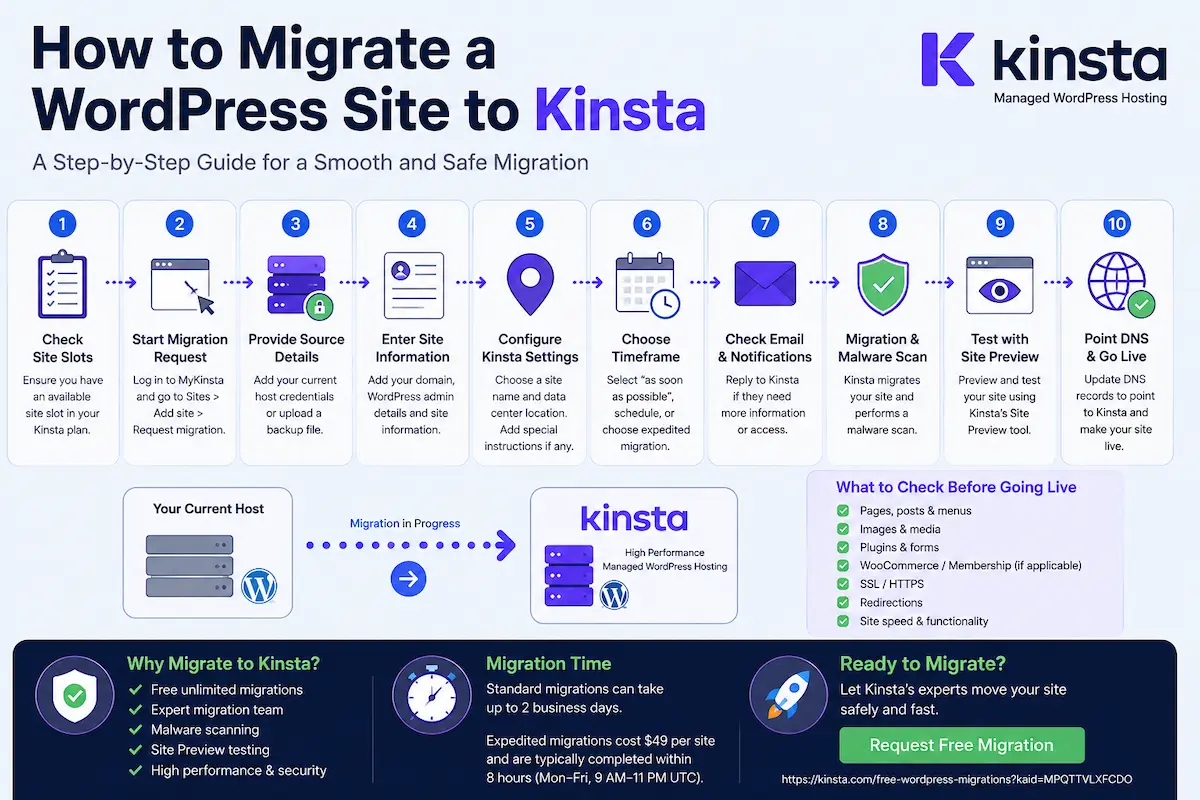
- How to Migrate a WordPress Site to Kinsta
- What to Check Before Changing DNS
- What to Check After DNS Changes
- Common WordPress Migration Problems
- Kinsta Migration vs. DIY Migration
- How Long Does a WordPress Migration Take?
- Pros and Cons
- Who Should Use Kinsta’s Migration Service?
- Who May Prefer a DIY Migration?
- Frequently Asked Questions
- Final Verdict
- Conclusion
- Call to Action
Quick Answer
To migrate a WordPress site to Kinsta, you can request a free migration through MyKinsta and provide the information Kinsta needs to access your current site. Kinsta creates a copy of the site on its infrastructure, then lets you preview and test it before changing your DNS. Once everything works correctly, you point your domain to Kinsta and verify the live site.
Introduction
Moving a WordPress site to Kinsta is easier when you prepare the migration, DNS settings, and testing steps in advance.
Kinsta provides a managed WordPress migration service designed to handle much of the technical transfer for you. Kinsta currently offers unlimited free migrations for standard WordPress installations from hosting providers, while also providing a paid expedited option — $49 per site, targeted at an eight-hour turnaround — when a faster timeline is needed.
This guide explains how the Kinsta migration process works, what you should prepare beforehand, how to test the migrated website, what happens when you change DNS, and what to check before cancelling your old hosting account.
Before You Migrate Your WordPress Site
Before submitting a migration request, there are several things you should understand.
- Kinsta creates a new site for the migration, so your plan needs an available site slot.
- Your existing website remains on your current host while the migration is being prepared.
- Kinsta migrations are performed Monday through Friday rather than on weekends.
- You should avoid making important changes to the original website while the migration is in progress because those changes may not be included in the migrated copy.
- Continuously changing websites such as ecommerce and membership sites may require maintenance mode to prevent new data from being lost during the transfer.
Kinsta also supports migrations from backup files, so you do not necessarily have to provide direct access to your existing hosting account if you have a supported backup available.
Does Kinsta Offer Free WordPress Migrations?
Yes. Kinsta currently offers unlimited free migrations for standard WordPress installations from hosting providers. You can request a migration through MyKinsta and provide information about your current host or use a supported backup file.
Kinsta also offers an expedited migration option for sites that need a faster turnaround. The current price is $49 per site, and Kinsta says it aims to complete expedited migrations within eight hours during its stated Monday-to-Friday service window (9 AM to 11 PM UTC).
If you are considering Kinsta specifically because you want its migration team to handle the technical transfer, you can review the Kinsta WordPress migration service.
What You Need Before Starting
Preparing the required information before you submit the request can make the process smoother.
1. An Available Kinsta Site Slot
Kinsta creates a new site for the migration, so you need an available WordPress installation slot on your plan before starting the request.
2. Your Current Hosting Credentials
If Kinsta is connecting directly to your existing host, you will generally need the information required to access the site, such as the hostname, username, password, and SFTP or SSH details. Some hosting providers may require additional account information.
Make sure the credentials work before submitting them. Kinsta’s documentation also explains that two-factor authentication can prevent its migration team from accessing the account, so the required access needs to be arranged before the migration begins.
3. A Complete Backup if You Are Migrating From Backup
If you choose the backup-based migration method, make sure the backup contains the files and database required to recreate your WordPress site. Kinsta supports migrations using backup files shared through cloud storage or uploaded to an existing Kinsta website.
4. A Plan for Ecommerce or Membership Sites
If your site receives orders, registrations, comments, or other constantly changing data, you need to plan the migration carefully.
Kinsta recommends maintenance mode for continuously changing sites such as ecommerce, membership, and community websites so new data is not created on the old site while the migration is taking place.
5. Any Special Configuration
Tell Kinsta about unusual requirements before the migration. Examples can include custom server rules, reverse proxy configurations, WP Engine LargeFS, WordPress.com sites, Bedrock/Trellis configurations, or other non-standard setups.
How to Migrate a WordPress Site to Kinsta
Step 1: Make Sure Your Kinsta Plan Has an Available Site Slot
Before requesting the migration, check your MyKinsta account and make sure you can create another WordPress site.
Kinsta creates the destination site for the migration rather than overwriting your existing website at the old host.
Step 2: Open the Migration Request in MyKinsta
Log in to MyKinsta and start a new migration request. Kinsta’s current migration workflow allows you to choose between different migration methods, including migrating from another host or using a backup file.
Step 3: Choose Your Migration Timeframe
You can request the migration as soon as possible or schedule it when your website’s activity makes that more appropriate.
This is particularly important for ecommerce, membership, and community websites where new information may be added continuously.
If you need a faster turnaround, Kinsta also offers expedited migrations for $49 per site. Its current documentation says the target for expedited migrations is within eight hours during the stated Monday-to-Friday UTC service window.
Step 4: Provide Your Existing Hosting Details
If you are migrating directly from another host, provide the credentials and connection details Kinsta needs to access the website.
The exact information depends on your hosting provider. Kinsta maintains provider-specific instructions because different hosts can require different connection details.
Step 5: Provide Your WordPress and Site Information
The migration request also requires information about the website itself. Follow the current MyKinsta form and provide the requested domain, WordPress information, site details, and any special instructions that apply to your setup.
Be particularly careful when describing ecommerce, membership, multisite, reverse proxy, or other unusual configurations.
Step 6: Review and Submit the Migration Request
Before submitting, check the information carefully for errors. Incorrect or incomplete information can delay the migration.
Once submitted, keep an eye on your MyKinsta notifications and email. Kinsta’s migration team may contact you if additional information is needed.
Step 7: Let Kinsta Perform the Migration
Kinsta creates a copy of your existing WordPress site and transfers it to its infrastructure. The migration process can include a malware check, and Kinsta may contact you if an issue is discovered that needs your attention.
Do not assume that the old site has been replaced. The original site remains at the old host until you decide to change the DNS and make Kinsta the live destination.
Step 8: Preview the Migrated Website
Once the migration is complete, Kinsta provides instructions for previewing the migrated site before you change DNS.
Kinsta’s Site Preview tool allows you to view the migrated WordPress site through a temporary Kinsta URL without changing your site’s DNS records. It is specifically designed to let you test the site before making it live.
Step 9: Test the Website Thoroughly
Do not immediately change DNS just because the migration completed successfully.
Check:
- Homepage and important landing pages
- Posts and pages
- Navigation menus
- Images and media
- Contact forms
- Search functionality
- Login and registration
- Important plugins
- Theme functionality
- WooCommerce products and checkout, if applicable
- Membership functionality, if applicable
- Important redirects
- HTTPS and SSL behavior
Kinsta specifically recommends thoroughly testing content and functionality before updating DNS.
Step 10: Point Your Domain to Kinsta
After you are satisfied with the migrated site, update the relevant DNS records so visitors are directed to Kinsta.
This is the point at which your domain begins routing visitors to the Kinsta-hosted version of the website. Kinsta provides a Go Live Checklist to help with the final transition.
Step 11: Verify the Live Website
After DNS changes have propagated, open your domain normally and confirm that the live site is loading correctly from Kinsta.
Check important pages, HTTPS, forms, ecommerce functionality, redirects, and any external services that are important to your website.
Do not immediately cancel your old hosting account. Kinsta recommends keeping the previous hosting active until you have confirmed that the site is working correctly from Kinsta.
What to Check Before Changing DNS
Before pointing your domain to Kinsta, use Site Preview to verify the migrated website.
At minimum, check:
- Pages and posts
- Images and media files
- Menus and navigation
- Contact forms
- Important plugins
- Search functionality
- WooCommerce products, cart, and checkout
- Membership functionality
- Important redirects
- SSL and HTTPS configuration
The purpose of this stage is to find problems while your original website is still available to visitors. Kinsta’s Site Preview works without requiring you to change your domain’s DNS records first.
What to Check After DNS Changes
Once your DNS changes have propagated, perform another complete check using the real domain.
- Confirm that the domain resolves to the Kinsta site.
- Confirm HTTPS works correctly.
- Open several important pages.
- Test forms.
- Test ecommerce checkout if applicable.
- Check redirects.
- Check images and media.
- Check analytics and other third-party integrations.
- Verify that email-related DNS records have not been unintentionally changed.
Remember that moving your WordPress website does not automatically mean your email service is being migrated. Email is controlled through DNS and your email provider’s configuration, so check your mail-related records separately.
Common WordPress Migration Problems
A migration can be straightforward, but some websites have configuration or data issues that require additional attention.
Broken Links or Missing Images
Check important internal links and media after migration. Websites with hard-coded URLs or unusual configurations may require additional adjustments.
Plugin Conflicts
Some plugins interact closely with the hosting environment. Caching, security, backup, or optimization plugins may need configuration changes after moving to a different hosting platform.
DNS Problems
An incorrect DNS record can prevent visitors from reaching the new website. Check your DNS configuration carefully before and after the change.
SSL or HTTPS Issues
After the domain points to Kinsta, verify that HTTPS works across the important pages of the site. If you use hard-coded URLs or special SSL configurations, additional checks may be necessary.
Changes Made After the Migration Started
If you continue publishing content or receiving orders on the original site after the migration begins, those changes may not appear in the migrated copy.
Kinsta provides options for handling changes made to the original site before going live, including requesting a second migration when appropriate.
Multisite Limitations
Kinsta supports like-for-like WordPress multisite migrations, but it does not support importing or exporting individual multisite data as separate sites through its standard migration process.
Kinsta Migration vs. DIY Migration
Kinsta-Assisted Migration
With Kinsta’s assisted migration, the migration team handles the transfer using the information you provide. This can be useful if you are comfortable managing WordPress but do not want to handle SFTP, database exports, and other migration tasks yourself.
The main advantage is reduced technical work on your side: no manual database export, no manual file transfer, and no need to configure a migration plugin. Kinsta also provides tools and guidance — including Site Preview and a Go Live Checklist — for checking the migrated website before it goes live.
DIY Migration
If you prefer complete control, Kinsta also documents several self-migration approaches. These include manual migration using SFTP and MySQL, and migration using plugins such as Duplicator or Migrate Guru.
DIY migration can make sense for developers and experienced WordPress administrators who understand databases, files, DNS, and troubleshooting — for example, someone who already has a repeatable migration checklist and wants to control the exact timing of each step.
However, Kinsta warns that large or complex migrations performed without sufficient technical knowledge can lead to data loss or other problems. If your site involves a large database, custom server configuration, or heavy WooCommerce order volume, the assisted route removes a meaningful amount of that risk.
If you need a fully self-managed option: a manual SFTP/MySQL migration or a plugin such as Duplicator gives you full control over timing but puts file and database integrity checks entirely on you.
If you want Kinsta to handle the technical transfer: the free assisted migration and Site Preview combination is the lower-effort path for most standard WordPress sites.
How Long Does a WordPress Migration Take?
Kinsta says standard migrations are completed as soon as possible and can take up to two business days. The actual timing depends on the site and the information required to complete the migration.
For sites that need a faster turnaround, Kinsta currently offers an expedited migration for $49 per site. Kinsta says it aims to complete expedited migrations within eight hours during its stated Monday-to-Friday service window of 9 AM to 11 PM UTC.
For continuously changing ecommerce, membership, or community websites, the amount of time required in maintenance mode can vary depending on site size, transfer speed, DNS TTL, review time, and other factors. Kinsta notes that many such migrations take around one to three hours for the migration itself, followed by additional time for review, but this is not a guaranteed duration for every website.
Pros and Cons
Pros
- Unlimited free migrations for standard WordPress installations — no per-migration fee for a typical single-site transfer
- Kinsta’s migration team handles the SFTP, database export, and file transfer work for you
- Backup-based migration is supported, so direct host access isn’t always required
- Site Preview lets you fully test the migrated site on a temporary URL before touching DNS
- Expedited migration option ($49 per site, eight-hour target) is available when timing matters
- Documentation is available for DIY migrations using SFTP/MySQL or plugins like Duplicator and Migrate Guru
Cons
- Standard (free) migrations can take up to two business days rather than being instant
- Migration requests are processed Monday through Friday, not on weekends
- Ecommerce and other continuously changing sites require maintenance-mode planning to avoid losing new orders or signups
- You still need to handle the final DNS change yourself; Kinsta does not do this step for you
- Complex or non-standard configurations (multisite, reverse proxy, Bedrock/Trellis) may need extra back-and-forth with support
- Choosing DIY migration shifts technical responsibility — and risk of data loss on a botched transfer — entirely onto you
Who Should Use Kinsta’s Migration Service?
Kinsta’s migration service is a practical option for website owners who want to move to managed WordPress hosting without handling the entire technical transfer themselves.
Best for:
- Business websites and content websites moving from shared or generic hosting
- WooCommerce stores that want the migration team to account for order and inventory data
- Membership websites with ongoing user activity
- Agencies managing multiple WordPress sites for clients
- Website owners who are not comfortable with SFTP and database migration
- Site owners who want to test the migrated site before changing DNS
Who May Prefer a DIY Migration?
Not ideal for beginners; better suited to:
- Experienced WordPress developers and agencies who want full control over the migration process and exact timing
- Teams that already have a working, repeatable migration workflow (for example, a documented SFTP/MySQL process or an existing Duplicator setup)
- Site owners with unusual configurations they’d rather manage directly than describe to a support team
You should understand the technical risks before choosing this route. Kinsta provides documentation for manual migrations and migration plugins, but troubleshooting a failed self-managed migration can require more technical work from you than a submitted, supported request would.
Frequently Asked Questions
Is Kinsta WordPress migration free?
Yes. Kinsta currently offers unlimited free migrations for standard WordPress installations. An expedited migration is available for $49 per site when a faster turnaround is needed.
Will my website go offline during migration?
For many standard websites, the migration can be completed without taking the live site offline. However, websites that continuously change, such as ecommerce, membership, and community sites, may need maintenance mode during the migration to prevent data loss.
Do I need to change DNS myself?
Yes. After you have tested the migrated site, you need to update the relevant DNS records so your domain points to Kinsta. Kinsta provides a Go Live Checklist to help with this final stage.
Can I test my website before changing DNS?
Yes. Kinsta’s Site Preview tool allows you to preview the migrated WordPress site through a temporary Kinsta URL before changing your domain’s DNS records.
Can I migrate a WordPress site from a backup?
Yes. Kinsta supports migration from supported backup files that contain the necessary website files and database. The backup can be shared through supported cloud storage or uploaded to an existing Kinsta website.
Can WooCommerce sites be migrated to Kinsta?
Yes. WooCommerce sites can be migrated, but continuously changing ecommerce websites require additional planning. Kinsta recommends maintenance mode during migration when necessary to prevent new orders or other changes from being lost.
Can I migrate a multisite WordPress installation?
Yes, Kinsta supports like-for-like WordPress multisite migrations. However, Kinsta does not support importing or exporting individual multisite data as separate sites through its standard migration process.
How long does Kinsta migration take?
Kinsta says migrations can take up to two business days. Expedited migrations cost $49 per site and have an eight-hour target during the stated weekday service window. Actual timing can vary depending on the site’s size and complexity.
Should I cancel my old hosting immediately after migration?
No. First confirm that the website is loading correctly from Kinsta after the DNS change. Kinsta recommends cancelling the previous hosting only after you have verified that the migrated site is working correctly.
Is Kinsta’s migration service worth it for a beginner?
For most beginners, yes — the free assisted migration removes the need to manually export a database or configure a migration plugin, and Site Preview lets you check the result before anything goes live. The main tradeoff is timing: standard migrations aren’t instant and are processed on business days only.
Final Verdict
For most WordPress site owners, Kinsta’s assisted migration is the simplest way to move an existing website to its managed WordPress platform. Standard migrations are currently free, Kinsta’s team handles much of the technical transfer, and Site Preview gives you an opportunity to test the migrated website before changing DNS.
Experienced developers may prefer a DIY migration for greater control, but that approach requires a better understanding of WordPress files, databases, DNS, and troubleshooting.
The safest approach is straightforward: prepare your access information, request the migration, test the new copy thoroughly, change DNS only after you’re satisfied, and keep the old hosting active until you have confirmed that the live site works correctly.
Conclusion
Migrating a WordPress site to Kinsta does not have to involve unnecessary downtime or a complicated manual transfer.
Kinsta’s current migration service can handle the main transfer for standard WordPress installations, while Site Preview allows you to test the new site before changing DNS. The main responsibility for the website owner is preparation, careful testing, and completing the final DNS and post-migration checks.
If your website is an ecommerce store, membership platform, or another site that changes continuously, plan the timing carefully and consider how new data created during migration will be handled.
Before cancelling your old hosting account, make sure the live domain, HTTPS, forms, plugins, media, redirects, and any important business functionality are working correctly on Kinsta.
Call to Action
If you are ready to move your WordPress website and want Kinsta’s migration team to handle the technical transfer, you can request a WordPress migration from Kinsta.
If you are still comparing Kinsta with other hosting providers, our existing comparisons can help you evaluate the differences before making a decision.
Internal Links
- Is Kinsta Worth It? A Practical 2026 Review
- Kinsta Pricing Explained: Plans, Costs & What You Get in 2026
- Kinsta vs SiteGround 2026: Which WordPress Host Actually Wins?
- Kinsta vs Cloudways 2026: Which Managed Hosting Wins?
Future Internal Linking Opportunities
- Best WordPress Hosting for WooCommerce Stores
- Best High-Performance WordPress Hosting
- Managed WordPress Hosting vs Shared Hosting
- Best Hosting for High-Traffic WordPress Sites
External Authority Sources
- Kinsta Migration Documentation
- Kinsta Migration FAQs
- Kinsta Site Preview Documentation
- Kinsta Go Live Checklist
- Kinsta Manual Migration Documentation
About the Author
T. Vasireddi is the founder and editor of ToolGrowthHQ, creating practical, research-based guides on web hosting, WordPress, SaaS tools, and digital marketing.
His focus is on providing clear, accurate, and useful information to help readers make better technology and software decisions.
Connect with him:
Follow for more AI tool reviews, SaaS comparisons, and digital marketing tips.